
A First Look at Dash
Published:
Dash is a cryptocurrency launched in 2014 that aims to be a convenient, fast, and private digital cash platform that is suitable for everyday transactions.
Outline
- Dash Platform Overview
- Create Wallet and Identity
- Data Contracts
- Setup Backend Server with Express
- Create Next App
Dash Platform Overview
Dash is a digital cryptocurrency that was launched in 2014. Originally called XCoin (XCO), it was renamed Darkcoin and then finally rebranded as Dash in 2015. “Dash” is a portmanteau of “Digital Cash” and was created as a fork of Bitcoin. Despite its origins, today Dash differs significantly from Bitcoin by aiming to be a convenient, fast, and private digital cash platform that is suitable for everyday transactions. This goal is reflected in its design features which include:
- PrivateSend: This feature ensures user privacy by mixing transactions together, making them untraceable to individual users.
- InstantSend: Dash’s InstantSend feature enables near-instant transaction confirmations that are faster than Bitcoin’s.
- Masternodes: Dash’s network includes masternodes (or full nodes) which power its unique features like InstantSend and PrivateSend, as well as its governance system.
- Decentralized Autonomous Organization: Dash operates as a DAO, meaning it is a transparent, member-controlled organization free from central government influence.
- Block Reward Allocation: Dash’s block reward is split between miners (45%), masternodes (45%), and a development fund (10%), ensuring ongoing platform maintenance and development.
In 2019, an MVP of the Dash Platform (originally codenamed “Evonet”) was launched. The Dash Platform is a technology stack for building decentralized applications (dApps) on the Dash network. It represents a shift away from the original, transaction-focused blockchain systems inspired by Bitcoin by aiming to make Dash more like newer, application-focused blockchains such as Ethereum and Solana.
Key features of the platform include:
- Dash Drive: A decentralized API that lets users store and interact with data on the Dash network, similar to a cloud database service.
- Decentralized API (DAPI): Allows developers secure, decentralized access to full node capabilities without needing to host one.
- Usernames via Dash Platform Name Service (DPNS): Enables the creation of memorable usernames to replace complex cryptographic addresses.
- Platform Chain: A separate chain for storing platform data, secured by the masternodes of the main Dash network.
- Dash Libraries: A collection of integrated open source libraries for developing on the Dash Platform.
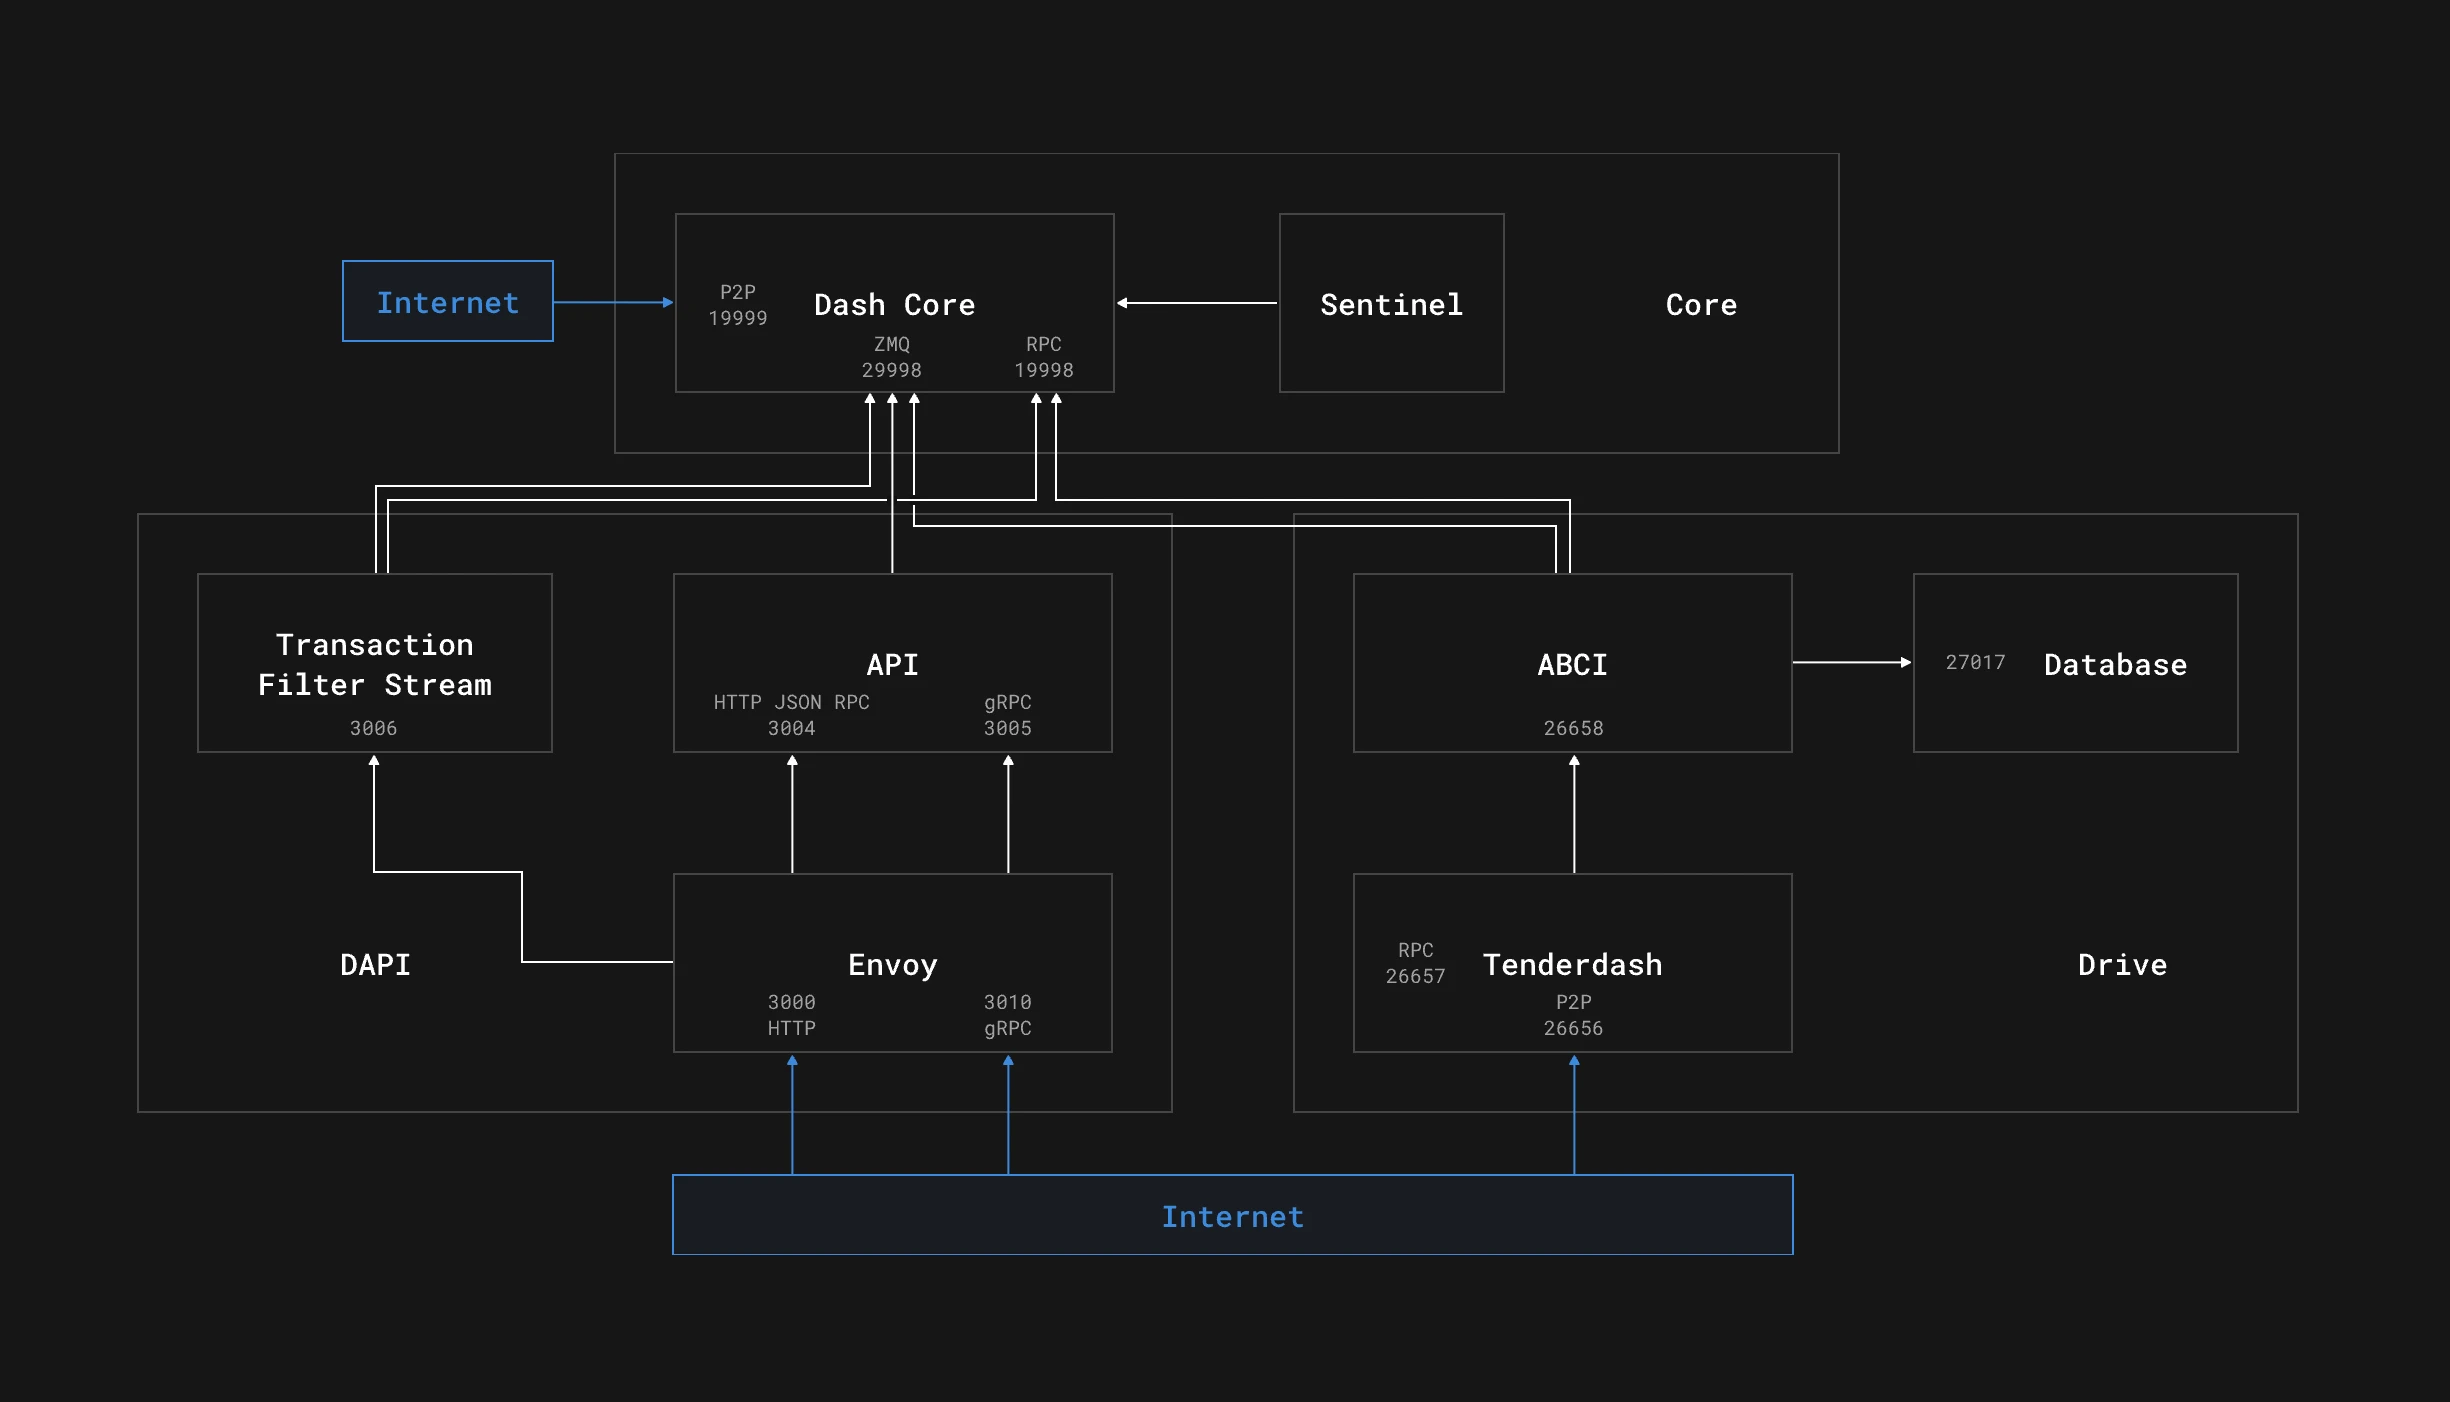
Here’s an architectural overview of the Dash Platform to get a better sense of how the different parts of the platform relate to one another:
Setup and Configure Node Project
Requirement: Node v20 or higher
mkdir dash-examples && \ cd dash-examples && \ npm init -y && \ npm pkg set type="module" && \ npm i dash@4.0.0-rc.2 && \ echo > .gitignoreAdd the following to .gitignore:
.DS_Storenode_modules.envdistCreate a README.md file for any feedback you have while going through the tutorial:
echo '## Feedback about Dash and this tutorial' > README.mdWe’ll create each script file individually throughout the tutorial but for the sake of simplifying your life while following along with this tutorial, I’d recommend adding all of the Node scripts that will be implemented by the end of the tutorial.
Open package.json and include the following scripts:
npm pkg set \ 'scripts.createWallet=node --env-file=.env --no-warnings scripts/01-createWallet' \ 'scripts.createIdentity=node --env-file=.env --no-warnings scripts/02-createIdentity' \ 'scripts.retrieveIdentities=node --env-file=.env --no-warnings scripts/03-retrieveIdentities' \ 'scripts.topUpIdentities=node --env-file=.env --no-warnings scripts/04-topUpIdentities' \ 'scripts.registerName=node --env-file=.env --no-warnings scripts/05-registerName' \ 'scripts.retrieveName=node --env-file=.env --no-warnings scripts/06-retrieveName' \ 'scripts.registerContract=node --env-file=.env --no-warnings scripts/07-registerContract' \ 'scripts.retrieveContract=node --env-file=.env --no-warnings scripts/08-retrieveContract' \ 'scripts.updateContract=node --env-file=.env --no-warnings scripts/09-updateContract' \ 'scripts.submitNoteDocument=node --env-file=.env --no-warnings scripts/10-submitNoteDocument' \ 'scripts.getDocuments=node --env-file=.env --no-warnings scripts/11-getDocuments' \ 'scripts.updateNoteDocument=node --env-file=.env --no-warnings scripts/12-updateNoteDocument' \ 'scripts.deleteNoteDocument=node --env-file=.env --no-warnings scripts/13-deleteNoteDocument' \ 'scripts.express=node --env-file=.env --no-warnings --watch api/server'Initialize Dash Client
Create a scripts directory for our Node scripts and an api directory with a file called client.js for initializing Dash.Client. The network will be set to testnet via the NETWORK environment variable in .env.
mkdir api scriptsecho > api/client.jsecho 'NETWORK="testnet"' > .envImport Dash from dash, pass the project’s network and wallet configuration through Dash’s Client constructor, and export client.
import Dash from "dash"
const { NETWORK } = process.env
export const client = new Dash.Client({  network: NETWORK,  // Picking a known good ip address can sometimes help reliability  // Uncomment the next line if network is throwing errors  // dapiAddresses: ["44.227.137.77:1443"],  wallet: {    offlineMode: true,  },})
export const log = console.logexport const err = console.errorexport const dir = console.dir
export const platform = client.platformexport const wallet = client.wallet
Because we haven’t created a wallet yet, mnemonic is set to null to indicate we want a new wallet to be generated.
- To get a new address for an existing wallet replace
nullwith an existing wallet mnemonic. offlineModeis set totrue, indicating we don’t want to sync the chain.- This can only be used when the mnemonic is set to
null.
Create Wallet and Identity
Create a file called 01-createWallet.js.
echo > scripts/01-createWallet.jsWe’ll use three functions to create a wallet:
getWalletAccount()to get our wallet.exportWallet()to export the 12 word mnemonic phrase.getUnusedAddress()to create a new address.
import { log, err, client, wallet } from '../api/client.js'
async function createWallet() {  try {    const walletAccount = await client.getWalletAccount()    const mnemonic = wallet.exportWallet()    const { address } = walletAccount.getUnusedAddress()
    log("WALLET_ADDRESS=" + `"${address}"`)    log("MNEMONIC=" + `"${mnemonic}"`)  } catch (error) {    err('Something went wrong:\n', error)  } finally {    client.disconnect()  }}
createWallet()
Run the createWallet script.
npm run createWalletThe output will include our two environment variables:
WALLET_ADDRESS="yVtCv413ByXiRxkixsj4M2LR6FyrJzVYzL"MNEMONIC="exile slab craft fade august tape length various borrow taxi bulb abuse"Copy these and place them in your .env. We’ll do the same throughout the rest of this tutorial.
Add Funds to Wallet with Testnet Faucet
Send test funds to the “unused address” from the console output using a Dash testnet faucet, such as Dash Core Group’s (sometimes buggy) or CrowdNode’s. Wait for the funds to be confirmed before trying to use them, it may take a few minutes. You can check the status of confirmations with the Dash block explorer.
Search for your wallet address (yfvkghuK1fbDc7GBeadfMa47d9WaBpLxij in my case) to see your balance and list of transactions:

Click on the transaction link (9ca05a57d2f8e55068a5c8be4453d3a84aa852304d1aa3d32d92b9b5afe32261 in my case) to view information on the transaction itself.
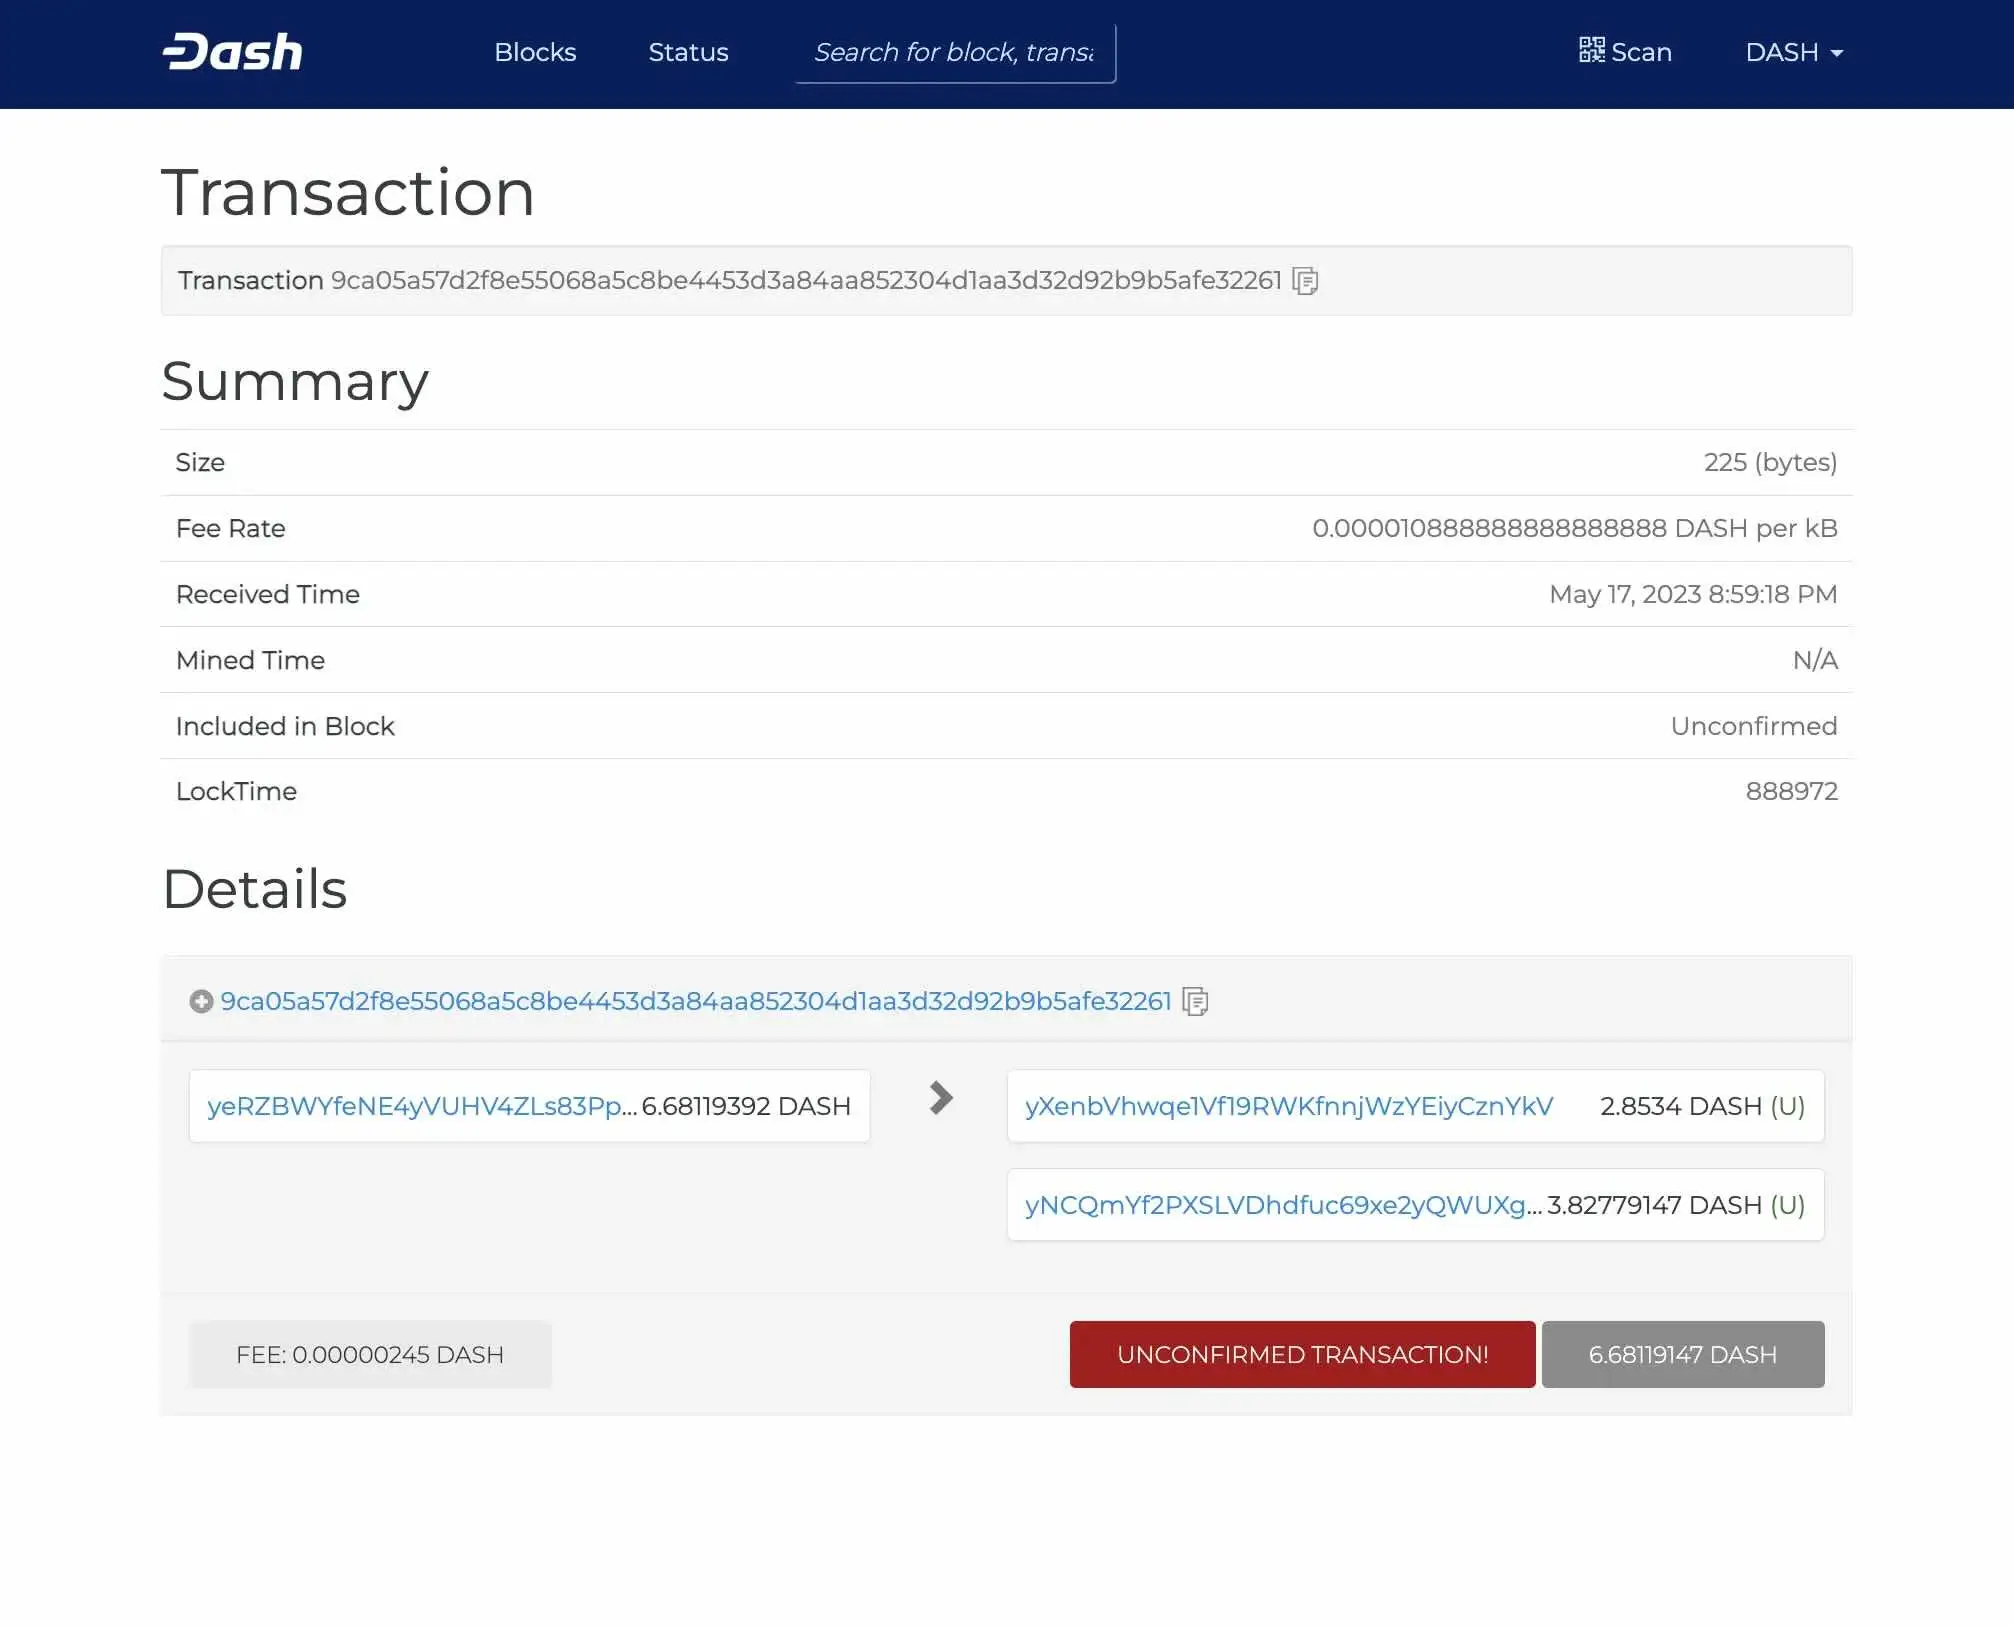
You can also click on the plus symbol (+) next to the transaction link for more information related to the transaction confirmation.

Register and Retrieve Identity
Modify the client again and include your wallet’s MNEMONIC seed phrase saved in .env.
import Dash from "dash"
const { NETWORK, MNEMONIC } = process.env
export const client = new Dash.Client({  network: NETWORK,  // Picking a known good ip address can sometimes help reliability  // Uncomment the next line if network is throwing errors  // dapiAddresses: ["44.227.137.77:1443"],  wallet: {    mnemonic: MNEMONIC,    unsafeOptions: {      skipSynchronizationBeforeHeight: 990000,    },  },})
export const log = console.logexport const err = console.errorexport const dir = console.dir
export const platform = client.platformexport const wallet = client.wallet
Create a file called 02-createIdentity.js.
echo > scripts/02-createIdentity.jsTo create an identity, we’ll run the identities.register() function.
import { log, err, client, platform } from '../api/client.js'
async function createIdentity() {  try {    const identity = await platform.identities.register()
    log("IDENTITY_ID=" + `"${identity.toJSON().id}"`)    log(`\nView on platform block explorer: https://testnet.platform-explorer.com/identity/${identity.toJSON().id}\n`)  } catch (error) {    err('Something went wrong:\n', error)  } finally {    client.disconnect()  }}
createIdentity()
Run the createIdentity script.
npm run createIdentityNote: Add the following output to .env:
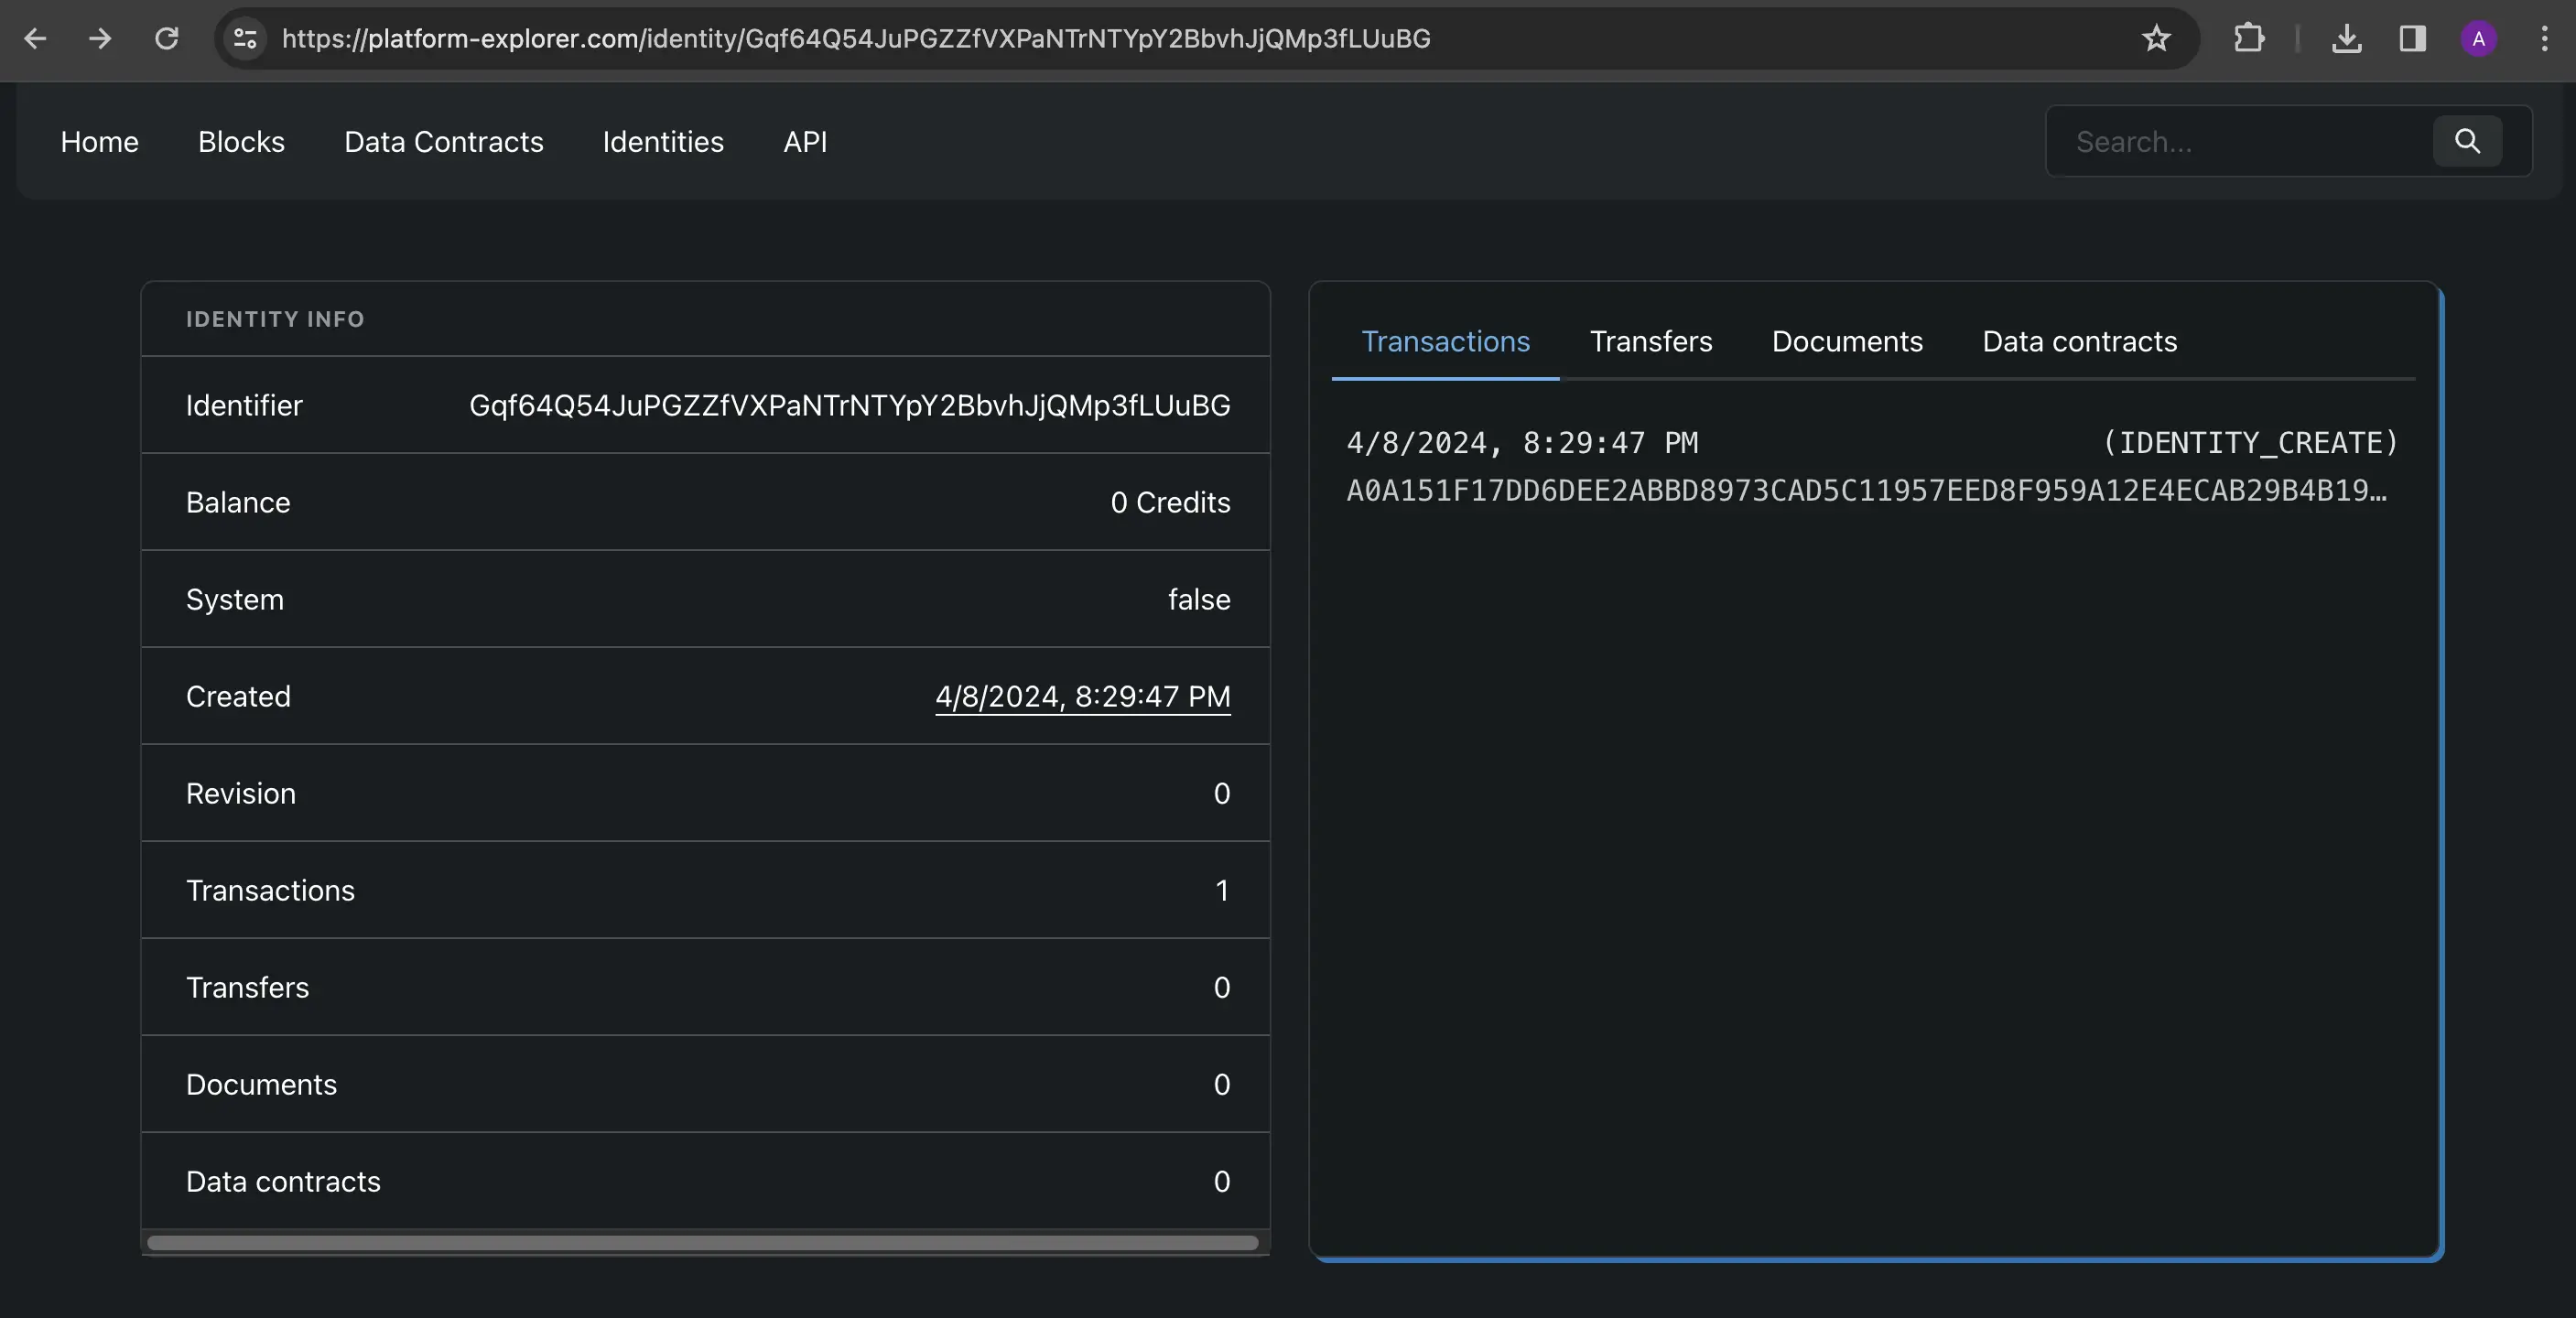
IDENTITY_ID="Atx8CpmKMgDvxWXrRfgCJ44GmUSPiB1qXkfoyotttHd"Earlier, we saw how to view our transactions on the Dash block explorer. For operations performed on Dash Platform, there is a separate explorer at platform-explorer.com for mainnet and testnet.platform-explorer.com for testnet.
- Open the Identities tab to see your ID on the list.
- Alternatively,
createIdentityappends the ID to the URLhttps://testnet.platform-explorer.com/identity/and outputs the link to your terminal for convenience.
Create a file called 03-retrieveIdentities.js.
echo > scripts/03-retrieveIdentities.jsgetIdentityIds() with return your identity ID’s which can be passed to identities.get().
import { log, err, client, platform } from '../api/client.js'
async function retrieveIdentities() {  try {    const walletAccount = await client.getWalletAccount()    const identityIds = walletAccount.identities.getIdentityIds()    log("\nRetrieved Identity IDs:\n" + JSON.stringify(identityIds, null, 2))
    for (const id of identityIds) {      const identity = await platform.identities.get(id)      log(`\nIdentity ID: ${id}`)      log(`  - Balance: ${identity.balance} credits`)    }  } catch (error) {    err('Something went wrong:\n', error)  } finally {    client.disconnect()  }}
retrieveIdentities()
Run the retrieveIdentities script:
npm run retrieveIdentitiesOutput:
Identity ID: 6vx4nFiHFm7NVWDUFeKPEKxmYBX3heTcUCdgC16jNdpK - Balance: 874253070When an Identity is created, a special transaction transforms Dash into credits which are used to interact with Dash Platform. 1 DASH is equal to 100,000,000 Duffs (Dash’s version of the Satoshi) and 100 million Duffs is equal to 100 billion credits. Since interacting with Dash Platform applications decreases your credit balance, at a certain point you’ll need to topup the balance by converting some Dash to credits.
Create a file called 04-topUpIdentities.js.
echo > scripts/04-topUpIdentities.jsgetIdentityIds() will be used again and the ID’s will be passed to identities.topUp().
import { log, err, client, platform } from '../api/client.js'
async function topUpIdentities() {  try {    const walletAccount = await client.getWalletAccount()    const identityIds = walletAccount.identities.getIdentityIds()
    for (const id of identityIds) {      await platform.identities.topUp(        id,        10000000      )
      const identity = await platform.identities.get(id)      log(`IDENTITY_CREDIT_BALANCE for ID ${id}: ${identity.balance}`)    }  } catch (error) {    err('Something went wrong:\n', error)  } finally {    client.disconnect()  }}
topUpIdentities()
Run the topUpIdentities script:
npm run topUpIdentitiesOutput:
IDENTITY_CREDIT_BALANCE for ID 6vx4nFiHFm7NVWDUFeKPEKxmYBX3heTcUCdgC16jNdpK: 874253070Register and Retrieve Name
Create a file called 05-registerName.js.
echo > scripts/05-registerName.jsCreate a LABEL in .env with your desired name. Replace YOUR-NAME-HERE with your name. See the implementation details for naming constraints.
LABEL="<YOUR-LABEL-HERE>"Add the following to 05-registerName.js.
import { log, err, client, platform } from '../api/client.js'
const { IDENTITY_ID, LABEL } = process.env
async function registerName() {  try {    const identity = await platform.identities.get(IDENTITY_ID)    const nameRegistration = await platform.names.register(      `${LABEL}.dash`,      { identity: IDENTITY_ID },      identity    )
    log("LABEL=" + JSON.stringify(nameRegistration.toJSON().label))    log(`\nView on block explorer: https://testnet.platform-explorer.com/document/${nameRegistration.toJSON().$id}\n`)  } catch (error) {    err("Something went wrong:\n", error)  } finally {    client.disconnect()  }}
registerName()
Run the registerName script:
npm run registerNameOutput:
LABEL="ajcwebdev20240603"View on block explorer: testnet.platform-explorer.com/document/Ax2Psritj8p6cjkPfdFiwv3EBzc93Txhfv9mZnkrZi2
Create a file called 06-retrieveName.js.
echo > scripts/06-retrieveName.jsPass your name to platform.names.resolve().
import { log, err, client, platform } from '../api/client.js'
const { LABEL } = process.env
async function retrieveName() {  try {    const extendedDoc = await platform.names.resolve(`${LABEL}.dash`)    const name = JSON.parse(JSON.stringify(extendedDoc))
    log(`\nResolved name object:\n\n`, name)    log(`\nView on block explorer: https://testnet.platform-explorer.com/document/${name.$id}\n`)  } catch (error) {    err('Something went wrong:\n', error)  } finally {    client.disconnect()  }}
retrieveName()
Run the retrieveName script:
npm run retrieveNameResolved name object:
{ '$id': 'Ax2Psritj8p6cjkPfdFiwv3EBzc93Txhfv9mZnkrZi2', '$ownerId': '6vx4nFiHFm7NVWDUFeKPEKxmYBX3heTcUCdgC16jNdpK', label: 'ajcwebdev20240603', normalizedLabel: 'ajcwebdev20240603', normalizedParentDomainName: 'dash', parentDomainName: 'dash', preorderSalt: 'DP79t5gRhz8GYCVuZ3iCITAbnkcVygeR5ltifmAqDMo=', records: { identityId: 'WBx62yMsMigHiMpK6gYoaiuZulKGo0gcmv6X+fxv0FA=' }, subdomainRules: { allowSubdomains: false }, '$revision': 1, '$createdAt': null, '$updatedAt': null, '$transferredAt': null, '$createdAtBlockHeight': null, '$updatedAtBlockHeight': null, '$transferredAtBlockHeight': null, '$createdAtCoreBlockHeight': null, '$updatedAtCoreBlockHeight': null, '$transferredAtCoreBlockHeight': null, '$dataContract': { '$format_version': '0', id: 'GWRSAVFMjXx8HpQFaNJMqBV7MBgMK4br5UESsB4S31Ec', config: { '$format_version': '0', canBeDeleted: false, readonly: false, keepsHistory: false, documentsKeepHistoryContractDefault: false, documentsMutableContractDefault: true, documentsCanBeDeletedContractDefault: true, requiresIdentityEncryptionBoundedKey: null, requiresIdentityDecryptionBoundedKey: null }, version: 1, ownerId: '4EfA9Jrvv3nnCFdSf7fad59851iiTRZ6Wcu6YVJ4iSeF', schemaDefs: null, documentSchemas: { domain: [Object], preorder: [Object] } }, '$type': 'domain'}View on block explorer: testnet.platform-explorer.com/document/Ax2Psritj8p6cjkPfdFiwv3EBzc93Txhfv9mZnkrZi2
Data Contracts
A Data Contract on Dash Platform serves as a blueprint for the structure of data that an application intends to store on the decentralized network. It defines the schema of documents (data records) with JSON Schema.
- Contracts enable the platform to validate data against these schemas to ensure consistency and integrity.
- They are crucial for dApps and provide a structured and predictable way to interact with the Dash blockchain.
- Data Contracts facilitate data storage, retrieval, and manipulation in a trustless environment.
You can create Data Contracts through an online user interface at dashpay.io.
Register, Retrieve, and Update Contract
Create a file called 07-registerContract.js.
echo > scripts/07-registerContract.jscontracts.create() will take your identity and a spec for the contract. In this case the contract will be a simple string message.
import { log, err, client, platform } from '../api/client.js'
const { IDENTITY_ID } = process.env
const registerContract = async () => {  try {    const identity = await platform.identities.get(IDENTITY_ID)    const contractDocuments = {      note: {        type: 'object',        properties: { message: { type: 'string', position: 0 } },        additionalProperties: false      }    }
    const contract = await platform.contracts.create(      contractDocuments,      identity    )
    await platform.contracts.publish(      contract,      identity    )    log('\nContract registered:\n\n', JSON.stringify(contract, null, 2))    log(`\nView on platform block explorer:\n\nhttps://testnet.platform-explorer.com/dataContract/${contract.toJSON().id}\n`)    log("\nCONTRACT_ID=" + `"${contract.toJSON().id}"`)  } catch (e) {    err('Something went wrong:\n', e)  } finally {    client.disconnect()  }}
registerContract()
Run the registerContract script:
npm run registerContractNote: Add the following output to .env:
CONTRACT_ID="H4wBXB2RCu58EP7H7gGyehVmD7ij5MLZkAXW9SVUGPYb"Contract registered:
{ '$format_version': '0', id: '4FwqAJwrJsnrxG9BcufeXzJMEoaqq3YASjCezxsUcrso', config: { '$format_version': '0', canBeDeleted: false, readonly: false, keepsHistory: false, documentsKeepHistoryContractDefault: false, documentsMutableContractDefault: true, documentsCanBeDeletedContractDefault: true, requiresIdentityEncryptionBoundedKey: null, requiresIdentityDecryptionBoundedKey: null }, version: 1, ownerId: '6vx4nFiHFm7NVWDUFeKPEKxmYBX3heTcUCdgC16jNdpK', schemaDefs: null, documentSchemas: { note: { type: 'object', properties: [Object], additionalProperties: false } }}View on platform block explorer: testnet.platform-explorer.com/dataContract/4FwqAJwrJsnrxG9BcufeXzJMEoaqq3YASjCezxsUcrso
Create a file called 08-retrieveContract.js.
echo > scripts/08-retrieveContract.jsPass your contract ID to contracts.get().
import { log, err, dir, client, platform } from '../api/client.js'
const { CONTRACT_ID } = process.env
const retrieveContract = async () => {  try {    const contract = await platform.contracts.get(CONTRACT_ID)
    dir(contract.toJSON(), { depth: 5 })    log(`\nView on platform block explorer:\n\nhttps://testnet.platform-explorer.com/dataContract/${contract.toJSON().id}\n`)  } catch (e) {    err('Something went wrong:\n', e)  } finally {    client.disconnect()  }}
retrieveContract()
Run the retrieveContract script.
npm run retrieveContractOutput:
{ '$format_version': '0', id: '4FwqAJwrJsnrxG9BcufeXzJMEoaqq3YASjCezxsUcrso', config: { '$format_version': '0', canBeDeleted: false, readonly: false, keepsHistory: false, documentsKeepHistoryContractDefault: false, documentsMutableContractDefault: true, documentsCanBeDeletedContractDefault: true, requiresIdentityEncryptionBoundedKey: null, requiresIdentityDecryptionBoundedKey: null }, version: 1, ownerId: '6vx4nFiHFm7NVWDUFeKPEKxmYBX3heTcUCdgC16jNdpK', schemaDefs: null, documentSchemas: { note: { type: 'object', properties: { message: { type: 'string', position: 0 } }, additionalProperties: false } }}View on platform block explorer: testnet.platform-explorer.com/dataContract/4FwqAJwrJsnrxG9BcufeXzJMEoaqq3YASjCezxsUcrso
Create a file called 09-updateContract.js.
echo > scripts/09-updateContract.jsUse your identity ID and contract ID along with setDocumentSchema() and contracts.update().
import { log, err, client, platform } from '../api/client.js'
const { IDENTITY_ID, CONTRACT_ID } = process.env
const updateContract = async () => {  try {    const identity = await platform.identities.get(IDENTITY_ID)    const originalContract = await platform.contracts.get(CONTRACT_ID)    const documentSchema = originalContract.getDocumentSchema('note')
    documentSchema.properties.author = {      type: 'string',      position: 1    }
    originalContract.setDocumentSchema(      'note',      documentSchema    )
    await platform.contracts.update(originalContract, identity)    log('\nContract updated:\n\n', `${JSON.stringify(originalContract, null, 2)}`)  } catch (e) {    err('Something went wrong:\n', e)  } finally {    client.disconnect()  }}
updateContract()
Run the updateContract script.
npm run updateContractContract updated:
{ "$format_version": "0", "id": "H4wBXB2RCu58EP7H7gGyehVmD7ij5MLZkAXW9SVUGPYb", "config": { "$format_version": "0", "canBeDeleted": false, "readonly": false, "keepsHistory": false, "documentsKeepHistoryContractDefault": false, "documentsMutableContractDefault": true, "documentsCanBeDeletedContractDefault": true, "requiresIdentityEncryptionBoundedKey": null, "requiresIdentityDecryptionBoundedKey": null }, "version": 1, "ownerId": "Atx8CpmKMgDvxWXrRfgCJ44GmUSPiB1qXkfoyotttHd", "schemaDefs": null, "documentSchemas": { "note": { "type": "object", "properties": { "message": { "type": "string", "position": 0 }, "author": { "type": "string", "position": 1 } }, "additionalProperties": false } }}Add an apps object to the client options and pass the contract ID to enable <contract name>.<contract document> syntax while accessing contract documents (for example, tutorialContract.note).
import Dash from "dash"
const { NETWORK, MNEMONIC, CONTRACT_ID } = process.env
export const client = new Dash.Client({  network: NETWORK,  // Picking a known good ip address can sometimes help reliability  // Uncomment the next line if network is throwing errors  // dapiAddresses: ["44.227.137.77:1443"],  wallet: {    mnemonic: MNEMONIC,    unsafeOptions: {      skipSynchronizationBeforeHeight: 990000,    },  },  apps: {    tutorialContract: {      contractId: CONTRACT_ID,    },  },})
export const log = console.logexport const err = console.errorexport const dir = console.dir
export const platform = client.platformexport const wallet = client.wallet
Submit and Retrieve Documents
Create a file called submitNoteDocument.js.
echo > scripts/10-submitNoteDocument.jsAdd the following to 10-submitNoteDocument.js.
import { log, err, client, platform } from '../api/client.js'
const { IDENTITY_ID, LABEL } = process.env
const submitNoteDocument = async () => {  try {    const identity = await platform.identities.get(IDENTITY_ID)    const noteDocument = await platform.documents.create(      'tutorialContract.note',      identity,      { message: `Hello from ${LABEL} @ ${new Date().toUTCString()}` },    )
    await platform.documents.broadcast(      {        create: [noteDocument],        replace: [],        delete: [],      },      identity    )
    log(`${JSON.stringify(noteDocument, null, 2)}`)    log(`DOCUMENT_ID="${noteDocument.toJSON().$id}"`)  } catch (e) {    err('Something went wrong:\n', e)  } finally {    client.disconnect()  }}
submitNoteDocument()
Run the submitNoteDocument script.
npm run submitNoteDocumentNote: Add the following to .env:
DOCUMENT_ID="679YJYmZTRMLzmuVv2nvcMieid3WD3J4R29NKiafd3pd"Note document output:
{ "$id": "679YJYmZTRMLzmuVv2nvcMieid3WD3J4R29NKiafd3pd", "$ownerId": "Atx8CpmKMgDvxWXrRfgCJ44GmUSPiB1qXkfoyotttHd", "message": "Hello from ajcwebdev20250128 @ Fri, 31 Jan 2025 00:30:52 GMT", "$revision": 1, "$createdAt": null, "$updatedAt": null, "$transferredAt": null, "$createdAtBlockHeight": null, "$updatedAtBlockHeight": null, "$transferredAtBlockHeight": null, "$createdAtCoreBlockHeight": null, "$updatedAtCoreBlockHeight": null, "$transferredAtCoreBlockHeight": null, "$dataContract": { "$format_version": "0", "id": "H4wBXB2RCu58EP7H7gGyehVmD7ij5MLZkAXW9SVUGPYb", "config": { "$format_version": "0", "canBeDeleted": false, "readonly": false, "keepsHistory": false, "documentsKeepHistoryContractDefault": false, "documentsMutableContractDefault": true, "documentsCanBeDeletedContractDefault": true, "requiresIdentityEncryptionBoundedKey": null, "requiresIdentityDecryptionBoundedKey": null }, "version": 2, "ownerId": "Atx8CpmKMgDvxWXrRfgCJ44GmUSPiB1qXkfoyotttHd", "schemaDefs": null, "documentSchemas": { "note": { "type": "object", "properties": { "message": { "type": "string", "position": 0 }, "author": { "type": "string", "position": 1 } }, "additionalProperties": false } } }, "$type": "note"}Create a file called 11-getDocuments.js.
echo > scripts/11-getDocuments.jsAdd the following to 11-getDocuments.js.
import { log, err, client, platform } from '../api/client.js'
const getDocuments = async () => {  try {    const documents = await platform.documents.get(      'tutorialContract.note',      { limit: 5 }    )    log('\nLast 5 messages:\n')
    documents.forEach(      n => log(n.toJSON().message)    )  } catch (e) {    err('Something went wrong:\n', e)  } finally {    client.disconnect()  }}
getDocuments()
Run the getDocuments script:
npm run getDocumentsLast 5 messages:
Hello from ajcwebdev20250128 @ Fri, 31 Jan 2025 00:30:52 GMTUpdate and Delete Documents
Create a file called 12-updateNoteDocument.js.
echo > scripts/12-updateNoteDocument.jsAdd the following to 12-updateNoteDocument.js.
import { log, err, client, platform } from '../api/client.js'
const { IDENTITY_ID, DOCUMENT_ID, LABEL } = process.env
const updateNoteDocument = async () => {  try {    const identity = await platform.identities.get(IDENTITY_ID)
    const [document] = await platform.documents.get('tutorialContract.note', {      where: [[        '$id', '==', DOCUMENT_ID      ]]    })
    document.set(      'message',      `Hello from ${LABEL} again @ ${new Date().toUTCString()}`    )
    await platform.documents.broadcast(      { replace: [document] },      identity    )
    log('\nMessage: ', document.toJSON().message)    log('\nDocument updated:\n\n', `${JSON.stringify(document, null, 2)}`)  } catch (e) {    err('Something went wrong:\n', e)  } finally {    client.disconnect()  }}
updateNoteDocument()
Run the updateNoteDocument script:
npm run updateNoteDocumentOutput:
Message: Hello from ajcwebdev20250128 again @ Fri, 31 Jan 2025 00:35:08 GMTDocument updated:
{ "$id": "679YJYmZTRMLzmuVv2nvcMieid3WD3J4R29NKiafd3pd", "$ownerId": "Atx8CpmKMgDvxWXrRfgCJ44GmUSPiB1qXkfoyotttHd", "message": "Hello from ajcwebdev20250128 again @ Fri, 31 Jan 2025 00:35:08 GMT", "$revision": 1, "$createdAt": null, "$updatedAt": null, "$transferredAt": null, "$createdAtBlockHeight": null, "$updatedAtBlockHeight": null, "$transferredAtBlockHeight": null, "$createdAtCoreBlockHeight": null, "$updatedAtCoreBlockHeight": null, "$transferredAtCoreBlockHeight": null, "$dataContract": { "$format_version": "0", "id": "H4wBXB2RCu58EP7H7gGyehVmD7ij5MLZkAXW9SVUGPYb", "config": { "$format_version": "0", "canBeDeleted": false, "readonly": false, "keepsHistory": false, "documentsKeepHistoryContractDefault": false, "documentsMutableContractDefault": true, "documentsCanBeDeletedContractDefault": true, "requiresIdentityEncryptionBoundedKey": null, "requiresIdentityDecryptionBoundedKey": null }, "version": 2, "ownerId": "Atx8CpmKMgDvxWXrRfgCJ44GmUSPiB1qXkfoyotttHd", "schemaDefs": null, "documentSchemas": { "note": { "type": "object", "properties": { "message": { "type": "string", "position": 0 }, "author": { "type": "string", "position": 1 } }, "additionalProperties": false } } }, "$type": "note"}Now that we can create, read, and update our notes, all we have left to do is delete our notes. Create a file called 13-deleteNoteDocument.js.
echo > scripts/13-deleteNoteDocument.jsAdd the following to 13-deleteNoteDocument.js.
import { log, err, client, platform } from '../api/client.js'
const { IDENTITY_ID, DOCUMENT_ID } = process.env
const deleteNoteDocument = async () => {  try {    const identity = await platform.identities.get(IDENTITY_ID)
    const [document] = await platform.documents.get('tutorialContract.note', {      where: [[        '$id', '==', DOCUMENT_ID      ]]    })
    await platform.documents.broadcast(      { delete: [document] },      identity    )
    log('Document deleted:\n', document.toJSON())    log('Document deleted:\n', `${JSON.stringify(document, null, 2)}`)  } catch (e) {    err('Something went wrong:\n', e)  } finally {    client.disconnect()  }}
deleteNoteDocument()
Run the deleteNoteDocument script:
npm run deleteNoteDocumentDocument deleted:
{ "$id": "679YJYmZTRMLzmuVv2nvcMieid3WD3J4R29NKiafd3pd", "$ownerId": "Atx8CpmKMgDvxWXrRfgCJ44GmUSPiB1qXkfoyotttHd", "message": "Hello from ajcwebdev20250128 again @ Fri, 31 Jan 2025 00:35:08 GMT", "$revision": 2, "$createdAt": null, "$updatedAt": null, "$transferredAt": null, "$createdAtBlockHeight": null, "$updatedAtBlockHeight": null, "$transferredAtBlockHeight": null, "$createdAtCoreBlockHeight": null, "$updatedAtCoreBlockHeight": null, "$transferredAtCoreBlockHeight": null, "$dataContract": { "$format_version": "0", "id": "H4wBXB2RCu58EP7H7gGyehVmD7ij5MLZkAXW9SVUGPYb", "config": { "$format_version": "0", "canBeDeleted": false, "readonly": false, "keepsHistory": false, "documentsKeepHistoryContractDefault": false, "documentsMutableContractDefault": true, "documentsCanBeDeletedContractDefault": true, "requiresIdentityEncryptionBoundedKey": null, "requiresIdentityDecryptionBoundedKey": null }, "version": 2, "ownerId": "Atx8CpmKMgDvxWXrRfgCJ44GmUSPiB1qXkfoyotttHd", "schemaDefs": null, "documentSchemas": { "note": { "type": "object", "properties": { "message": { "type": "string", "position": 0 }, "author": { "type": "string", "position": 1 } }, "additionalProperties": false } } }, "$type": "note"}Setup Backend Server with Express
We’ve now learned how to run individual scripts to perform all the main functionality on the Dash Platform. Like any JavaScript library, we can extend this functionality with a backend and frontend. Let’s create an Express server that will return information on a given identity name.
npm i express corsecho > api/server.jsCreate a /name endpoint that will take an identity name:
import express from 'express'import cors from 'cors'import { log, err, client, platform } from './client.js'
const app = express()app.use(cors())
app.get('/name/:identityName', async (req, res) => {  try {    const name = req.params.identityName    const result = await platform.names.resolve(`${name}.dash`)
    if (result !== null) {      res.json(result.toJSON())    } else {      res.status(404).send(`No identity found with the name: ${name}.dash`)    }  } catch (error) {    err(error)    res.status(500).send('Something went wrong:\n' + error)  }})
const port = process.env.PORT || 3001
app.listen(port, () => {  log("Running on localhost:", port)})
process.on('SIGINT', async () => {  log('Disconnecting Dash client...')  await client.disconnect()  process.exit(0)})
Start the server with the following command:
npm run expressOpen localhost:3001/name/<LABEL> (with your label instead of <LABEL>) or send a GET request with curl.
curl "http://localhost:3001/name/<LABEL>" -s | json_ppCreate Next App
Now we’ll add a frontend and use Next.js to build a React based UI.
npx create-next-app@latest nextSelect the following for configuration:
✔ Would you like to use TypeScript? … No✔ Would you like to use ESLint? … No✔ Would you like to use Tailwind CSS? … Yes✔ Would you like your code inside a `src/` directory? … Yes✔ Would you like to use App Router? (recommended) … Yes✔ Would you like to use Turbopack for `next dev`? … Yes✔ Would you like to customize the import alias (`@/*` by default)? … NoOpen page.js in next/src/app and include the following code:
const main = "flex flex-col items-center justify-between p-24"const header = "text-3xl"const pageContent = "z-10 max-w-5xl w-full items-center justify-between font-sans lg:flex"
export default function Home() {  return (    <main className={main}>      <h1 className={header}>Next.js Dash Example</h1>      <div className={pageContent}>        <h2>Identity:</h2>      </div>    </main>  )}
Start your server with the following command:
cd nextnpm run devSetup React Project Structure
Now let’s include the logic to fetch our name. First, create a new .env.local file in your Next.js project and add NEXT_PUBLIC_LABEL="" with your label.
echo 'NEXT_PUBLIC_LABEL=""' > .env.local"use client"
import { useEffect, useState } from 'react'
const main = "flex flex-col items-center justify-between p-24"const header = "text-3xl"const pageContent = "z-10 max-w-5xl w-full items-center justify-between font-sans lg:flex"
export default function Home() { const [blockchainData, setBlockchainData] = useState(null) useEffect(() => { fetch(`http://localhost:3001/name/${process.env.NEXT_PUBLIC_LABEL}`) .then(response => response.json()) .then(data => setBlockchainData(data)) }, []) return ( <main className={main}> <h1 className={header}>Next.js Dash Example</h1> <div className={pageContent}> <h2>Identity:</h2> <pre> {JSON.stringify(blockchainData, null, 2)} </pre> </div> </main> )}Add Fetch Button to React App
Now lets add a button that when clicked will fetch our name information.
"use client"
import { useEffect, useState } from 'react'
const main = "flex flex-col items-center justify-between p-24"const header = "text-3xl"const pageContent = "z-10 max-w-5xl w-full items-center justify-between font-sans lg:flex"
export default function Home() {  const [blockchainData, setBlockchainData] = useState()  const [triggerFetch, setTriggerFetch] = useState(false)  const [isLoading, setIsLoading] = useState(false)
  const fetchData = () => {    setIsLoading(true) // Set loading to true when fetch begins    fetch(`http://localhost:3001/name/${process.env.NEXT_PUBLIC_LABEL}`)      .then(response => response.json())      .then(data => {        setBlockchainData(data)        setIsLoading(false) // Set loading to false when fetch completes      })  }
  useEffect(() => {    if (triggerFetch) {      fetchData()      setTriggerFetch(false) // Reset trigger    }  }, [triggerFetch])  return (    <main className={main}>      <h1 className={header}>Next.js Dash Example</h1>      <div className={pageContent}>        <h2>Identity:</h2>        <button onClick={() => setTriggerFetch(true)}>          Fetch Data        </button>        <pre>          {isLoading            ? 'Loading...'            : JSON.stringify(blockchainData, null, 2)          }        </pre>      </div>    </main>  )}
In future blog posts we’ll expand out our frontend to include more of the functionality included in our Node scripts. We’ll also build out front-ends with other popular frameworks.